Improving a ChatOps security alert system for better reporting and attribution
Introduction
Incident Response teams need to do many things well to succeed, but communication and collaboration are pretty near the top of that list of things. The collaboration model known as "ChatOps", which involves handling incidents through instant messaging platforms, has gained significant traction with security teams for its ability to support those two crucial objectives. Rapid7 published a great article about the use of ChatOps by security teams that inspired some of my thoughts for this post, and I recommend you read it.
In this writeup, I'll outline a project I completed to fill two common gaps in ChatOps: attribution and reporting.
TL;DR
I designed and implemented an improved ChatOps workflow for security alert handling using Microsoft Teams and Power Automate. The project focused on solving two shortcomings of ChatOps: reliably attributing alert resolution to individual analysts and turning alert activity into useful, reportable data.
Key features of the solution include:
- Interactive Adaptive Cards that present SIEM alerts in a concise, analyst-friendly format directly in Microsoft Teams.
- Automated alert ownership and status tracking, including automatic assignment to responding analysts and support for reassignment.
- Reaction-based workflows that allow analysts to claim, resolve, and classify alerts without leaving Teams.
- Automated follow-ups and escalation reminders to prevent unhandled alerts from falling through the cracks.
- Approval workflows for false-positive classifications, providing additional oversight for junior analysts.
- Persistent state management using SharePoint, overcoming the stateless nature of Adaptive Cards and enabling cards to be updated throughout an investigation.
- Automated collection of alert metrics for reporting on analyst workload, response times, false-positive rates, and other operational trends.
- Reusable child workflows and centralized Adaptive Card generation to reduce duplicated logic and make the automation easier to maintain.
- Global error handling and production/test controls to make the workflows safer and more reliable in an operational environment.
The result is a ChatOps system that retains the speed and convenience of handling security alerts through Teams while adding the ownership, accountability, automation, and metrics needed to operate and improve a security program over time.
The Problem
As is mentioned in Rapid7's article, ChatOps supports real-time documentation and auditability. Every step is captured in chat history, from the moment an alert is triggered to every subsequent reply or comment. Another benefit of ChatOps is how easy it is for people to respond to issues when they're reported in an instant messaging app they're used to checking frequently.
Both of these benefits present inherent struggles.
-
Although every event is recorded in chat history, it's difficult to extract useful reporting from chat history. If you want to know the average amount of time it takes team members to respond to alerts, you'll probably have to manually scroll back through the chat history and calculate the average response time for every alert for a certain time period.
-
While it's easy for team members to respond to alerts through a familiar chat interface, it's hard to consistently attribute alert resolution to specific people in a reportable way. How do you know who handles the most alerts? What if some alert types only ever get handled by one or two people? Being able to answer these questions enables teams to identify room for improvement, ensure efficient workload distribution, and detect possible training gaps.
The Plan
In this project, there's a security team using ChatOps with Microsoft Teams to handle their most quotidian, repetitious alerts. Delivery of these alerts to Microsoft Teams makes Power Automate a strong candidate to help resolve the issues. Here's how I developed a plan to address these issues:
Facilitate better reporting
GOAL: Use Power Automate to extract key attributes from each alert and store them in a database for easy reference later.
PLAN: Since Power Automate controls the publication of messages to Teams, we'll simply add steps to the publication workflow to store key values in a SharePoint list.
Achieve reliable attribution of alert resolution
GOAL: Use Power Automate to track alert ownership without requiring tedious work from team members to do so.
PLAN:
-
Implement a means of tracking and updating alert status. To track who handled an alert, we need a way to consider an alert resolved.
-
Give each alert an owner, and record that ownership information in a database.
-
Give team members a means of updating alert attributes as needed to reflect progress over time. (E.g., update status from
PendingtoResolved, reassign an alert to someone else.) As you'll discover later in the writeup, this step created an opportunity to track additional alert metrics like false positive rate, which were previously difficult to track.
Implementing a Solution
One of my goals in implementing this solution was to facilitate easier alert consumption through user-friendly visual design. I decided to use Microsoft's Adaptive Cards to deliver alerts in a responsive, aesthetically pleasing format. This afforded a number of benefits, which I have documented in the following sections:
Adaptive Card Layout
Here are two examples of card layouts I developed for two different alert types.
Regular security event card
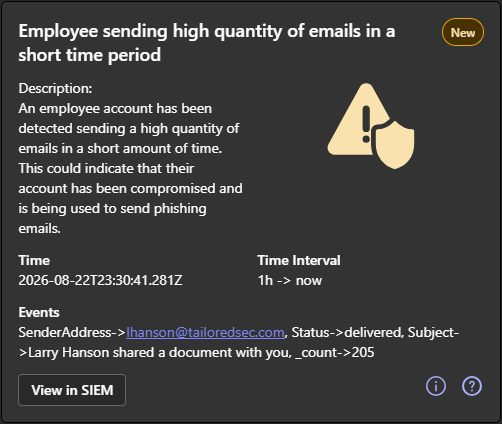
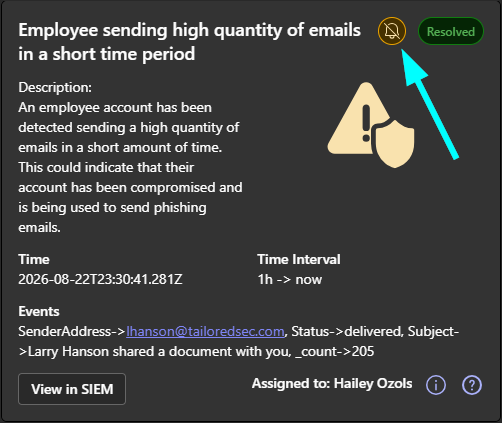
In this example, we observe a simple security alert triggered by an employee sending a high volume of emails in a short period of time. The adaptive card contains most of the details a security analyst would need to quickly understand the nature of the incident: a timeframe, the email address of the affected employee, the subject line of the emails being sent, the number of emails sent, a description of the alert theory to provide context for an investigation, and a link to view the alert in the SIEM.
I'd also like to point out some of the key elements of the alert card that enrich the content with helpful context. In the top right, there's a yellow label marking this as a "New" alert. This way, analysts can quickly identify alerts still needing to be claimed. In the bottom right corner, there are two buttons that allow users to gather helpful hints about the alert.
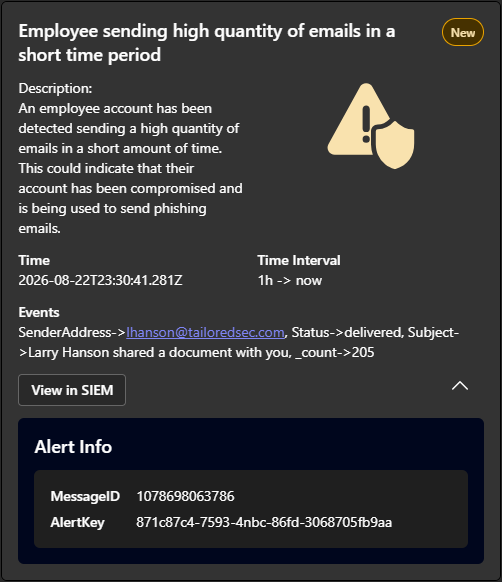
Clicking on the ℹ️ icon reveals the following menu, which contains some unique identifiers for this alert. The MessageID is an ID assigned to every Teams message by Microsoft and is the ID used to control this card through Power Automate. The AlertKey is an extra identifier used to distinguish this alert internally.
Clicking the ❔ icon reveals this other menu, which contains helpful "quick actions" analysts can use to interact with alert cards. These quick actions represent emojis which, if used in a reaction to the Teams message, trigger automated actions that update alert attributes.
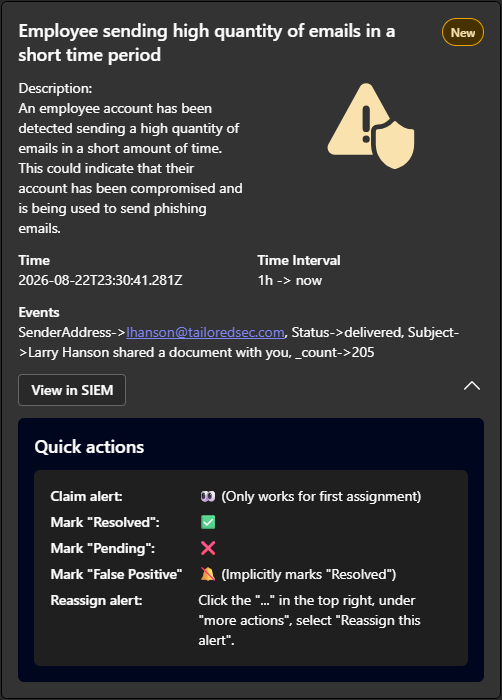
Rendering these alerts as adaptive cards provides significant flexibility, making it possible to include additional details in the alert without taking up too much space in the default view.
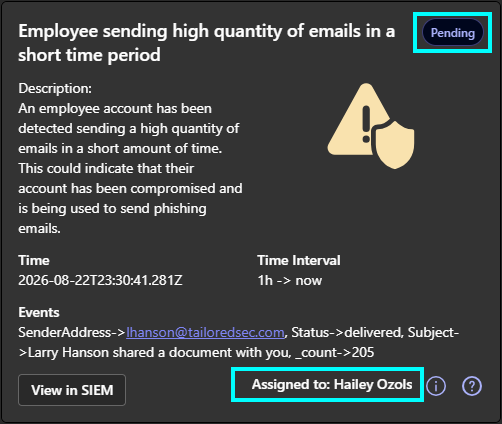
This next screenshot shows the same alert with an assignee and a "Pending" status.
Lastly, we can see an alert that's been resolved. This particular example also has an icon showing that it's been marked as a false positive. The yellow crossed-out bell icon indicates that this alert was a false positive. As we observed in the "quick actions" section earlier, analysts can mark an alert as a false positive by reacting to the message with the appropriate emoticon.
Security incident card
In this example, I've designed a card layout specifically for incidents that have tickets associated with them.
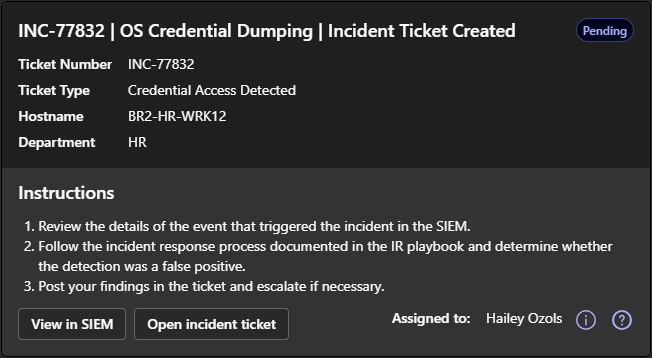
This card includes many of the same elements as the other, but it features extra details to guide an analyst in their response, as well as two helpful buttons with links to view the SIEM alert that triggered the incident or open the incident ticket.
Additional Functionality
Here are some additional notes about the functionality I implemented to make these cards usable and convenient.
-
Alerts are automatically assigned to the first analyst to leave a comment.
-
Analysts have the ability to manually claim an alert or reassign it to anyone else on the team.
-
Every time an alert gets posted to Teams, a secondary automation is triggered to follow up on the message and remind the team to handle it if it doesn't get handled within a certain amount of time. This helps make sure no alerts fall through the cracks during busy periods. If an alert has already been claimed, the owner gets tagged in a reminder message to help them avoid forgetting about it.
-
When a junior analyst marks an alert as a false positive, Power Automate generates an approval action that needs to be completed by a senior analyst. Senior analysts do not require approval and can mark alerts as false positives without requiring approval.
Power Automate Flow Logic
I'd like to showcase some of the logic I developed for the Power Automate workflows that power this alert system.
Flow Error Handling
I believe error handling is one of the most important parts of an automated workflow. Any time you trust a system to perform actions without oversight, you must ensure you'll be notified when it malfunctions.
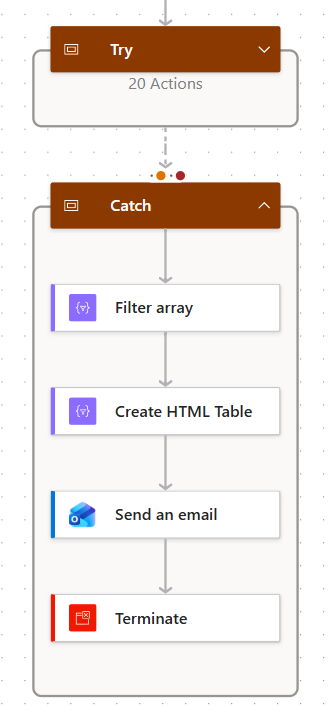
Here, I'm using a strategy I learned from a video by Reza Dorrani that enables global error handling for a Power Automate flow. With this strategy, I'll be notified if any of the flow actions fail. All my flow's actions are scoped to the "Try" block, and the "Catch" block runs only if one of the actions in the "Try" block fails.
Flow trigger and actions
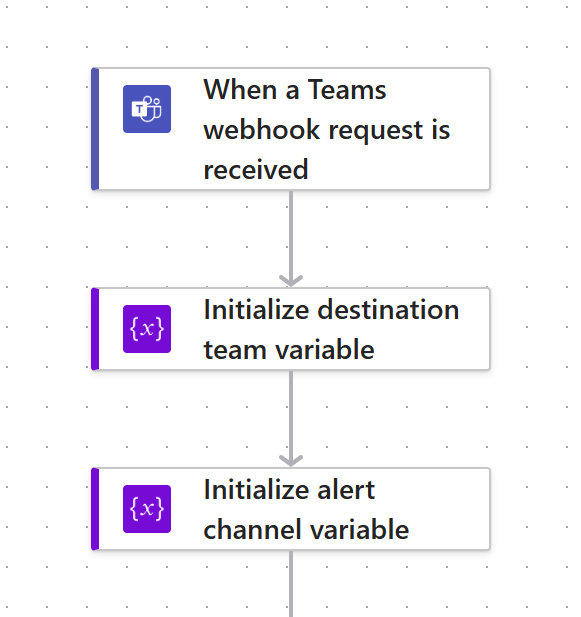
This flow uses a Teams Webhook trigger to listen for alerts from the SIEM. Anytime the SIEM sends structured JSON data with alert information to that webhook URL, Power Automate kicks off a flow to parse the data, format it as an adaptive card, store the data in a SharePoint list, and post the alert to Teams.
Here, you can see the trigger and a few subsequent variable initializations, which are included before the "Try" block because Power Automate disallows scoping of initialize variable actions.
Next, I'd like to showcase the section of the flow responsible for posting cards to Teams. This section has some error-handling logic built into it as well.
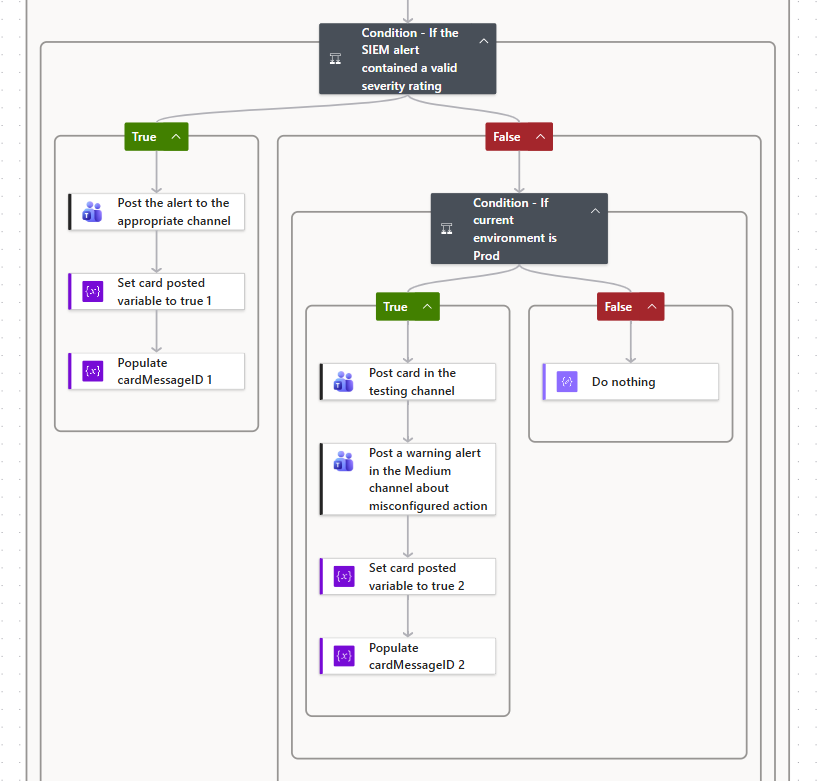
This section first makes sure the SIEM sent data that the flow knows how to process. If it is valid, the flow generates some adaptive card JSON and posts it to Teams. If it's invalid, it posts a warning message to a separate channel to warn the security team that the SIEM sent invalid data and should be investigated. It also features a condition to check whether the flow is being run in a Production environment. If it's being run in test mode, it won't post the alert to the production channel, which makes it easy to test flow functionality without disrupting the team's work.
When I built this flow, I copied the adaptive card JSON to each action responsible for posting alerts to Teams, as that JSON is a required parameter for those flow actions. However, I learned after several iterations that copying card JSON to multiple actions complicates future changes to card layout, especially when each action requires slight modifications to the card layout.
To resolve this problem, I built an entire flow responsible for generating adaptive card JSON. That flow has all the conditional logic necessary to generate any card layout I might need. Then, I refactored my other workflows to call that child workflow any time they need to post a card to Teams and used the dynamic output of that flow as the input parameter for the actions that post the cards to Teams.
This saved me from having to duplicate logic and made further updates to the adaptive card layout much easier.
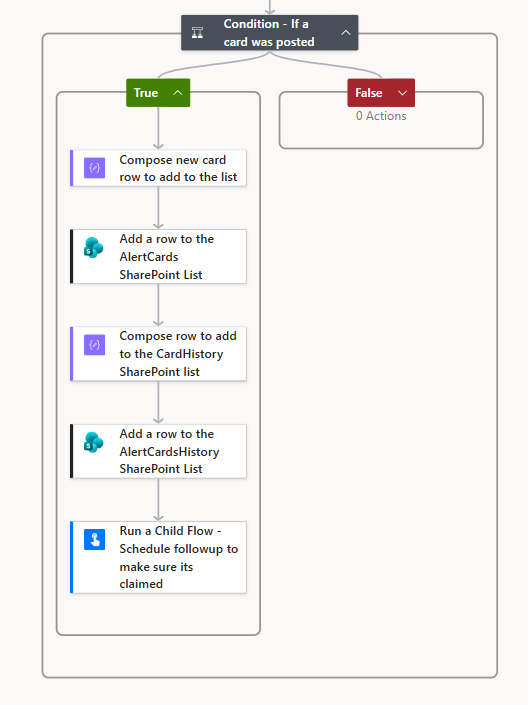
Lastly, I want to showcase the section of the flow that logs alert details and schedules follow-up messages.
In this section, the flow logs details to a SharePoint list that stores the card state, since adaptive cards are stateless (I'll write more about the adventures I had in dealing with that in the next section). It then creates a log in a different SharePoint list that serves as a record of actions taken on the alerts. Any time an alert is created or updated, that action is logged in this SharePoint list. Lastly, the flow calls a child flow that schedules a follow-up message. If the alert isn't claimed by anyone in a timely manner, a chatbot will send a follow-up message to ensure the alert doesn't get buried.
Challenges I Encountered
While architecting this flow, I encountered several challenges, of which the most striking is the fact that adaptive cards are stateless. This makes it quite difficult to update an adaptive card after it's been posted.
Stateless nature of adaptive cards
While there is an action in Power Automate to update an adaptive card, the action requires you to provide the full adaptive card JSON all over again, as it's incapable of referring to any present state information about the adaptive card. It essentially takes whatever JSON you give it and slots it into the place of the previous message, effectively overwriting whatever was there before. This is why I built a state table in the SharePoint list to store card state. That way, whenever a user reacts to a message, Power Automate triggers a flow that looks at the MessageID, finds the corresponding row in the state database, and updates whatever attributes need to be updated for the new card version.
But using reactions to trigger adaptive card updates wasn't my first preference. Adaptive cards include support for a breadth of functionality, including buttons and user input fields. However, after significant trial and error, I learned that I could not rely on adaptive card actions/inputs to trigger card updates.
Inability to handle updates through card fields
I originally wanted to take advantage of the buttons and input fields on adaptive cards to facilitate card interaction. In fact, you can see that I have still included buttons on my cards. The cards include buttons that open URLs in a user's browser for quick navigation. But the only reason these work is because I'm not relying on them to trigger card updates.
There are essentially two methods to trigger an adaptive card update by taking an action on the card itself in Teams.
Method 1: "Post an adaptive card and wait for a response"
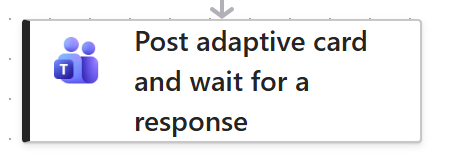
At first glance, this Power Automate action seems like the perfect solution to this problem. It's designed to post an adaptive card to Teams and pause its respective workflow until a user interacts with it. Once a user submits a response to the adaptive card, the flow will continue. You can then include a later action in the flow that updates the original card to reflect the user's response.
However, there is one problem... there is no such action as "update an adaptive card and wait for a response." This is the crux of the issue here. In our use case, we want the adaptive card to be a living record that reflects the current status of an ongoing incident investigation. We need team members to be able to interact with the card, comment on it, and establish a coherent thread that tracks the progress of the investigation over time. With the Post an adaptive card and wait for a response action, we only get one opportunity to update the card, and we're done.
You can try including inputs on the updated adaptive card, but there won't be any flow listening for responses, so the buttons will just be dead inputs.
One option you might consider is deleting the card and replacing it with another Post and wait for a response action. For some workflows, this might be sufficient. However, in a ChatOps use case with our requirements, we need to preserve the original message and its corresponding message thread. So deleting and replacing is not an option.
Method 2: "When someone responds to an adaptive card"
After determining through significant trial and error that Method 1 was simply not viable, I stumbled across a flow trigger called When someone responds to an adaptive card. This seemed like it was the answer to all my adaptive card problems, but that turned out to be a false hope.

You may notice that the styling of this flow trigger differs from the ones I've shown previously. That's because this action can only be used if you use Microsoft's deprecated flow designer interface. It's not supported in the new interface, which is the first red flag.
The way this action works is that it takes two inputs:
-
Adaptive card JSON
- This should match the JSON of the card you want to update. That's challenging if you are using dynamic adaptive cards with different data every time, like in the case of our alerts. Luckily, I found that it doesn't have to match the JSON perfectly! It only has to roughly match the same structure, and I haven't been able to learn the nuances of what makes this work and what breaks it.
-
A
Card Type IDCard Type IDis a parameter you can supply when you use thePost an adaptive card to a chat or channelaction in Teams. (Note: that's not the one that lets you wait for a response. It's just a one-time post action.) If you provide the sameCard Type IDin the action that posts the card and in the corresponding trigger action, you can trigger a flow that runs when someone responds to the adaptive card.
The main problem with this trigger is similar to the problem with Method 1. You can make changes to the adaptive card in the flow that gets triggered after the first response, but you won't be able to make any more changes after that. The reason for this is that the Update an adaptive card action does not include a Card Type ID field. So as soon as you make a change to an adaptive card, that identifier gets erased, and there's no way for the flow trigger to know it's supposed to be watching for that card.
The solution: Using reactions to trigger changes
Although it would have been nice to use buttons and input fields in the adaptive cards themselves to trigger repeated changes, I've found that reactions work really well for this.
You can use a flow trigger that listens for any time someone reacts to a message in a chat or channel with a certain emoji and do whatever you need to do from there. It works every time no matter how many times a card has changed, and when this technique is paired with a card state table in the form of a SharePoint list, you have a reliable and consistent way of triggering as many updates to a card as needed. This obviously makes it impossible to perform updates to an adaptive card that rely on free-form user responses, but learning to work within that limitation has forced me to get creative and simplify the workflow. I believe this has resulted in a better experience for security analysts overall.
Conclusion
I put significant work and thought into this project to build what I believe is a simple, efficient ChatOps workflow that enables essential reporting and analytics to help a security team mature and improve over time.
Easy and automated tracking of alert ownership and resolution has encouraged greater consistency and reliability in alert handling, ensuring that alerts no longer get forgotten and that they get resolved more quickly and consistently.
Automated recording of alert metrics has enabled the generation of helpful and informative reports that allow the team to better identify potential improvements and training opportunities.
I hope this guide is able to help someone else improve their ChatOps workflows as well.